7 - Module - Ansible Service
Goals
In this task, you will learn how to:
- Understand the project structure and execution flow of Ansible services
- Create a new Ansible playbook for automating CML
- Integrate third-party collections into your Ansible playbook
- Design a new service in NCAE which will trigger this playbook
- Hook everything together using the module setup
- Test your new Ansible-based service
Use Case
As you already know, your CML lab infrastructure consists of two routers and two switches. The goal of your next automation task is to write a small service which will automatically deploy a specific L2 VLAN onto a switch. Additionally, when retiring the service instance, the VLAN should be removed again.
Project Structure and Execution Flow
Just like in the previous Python Service, the instructions will once more show screenshots from PyCharm, but you can use any IDE for your choice for developing the Ansible playbook. The first step is to create a new Ansible playbook file, which will later on be executed by NCAE when running your service.
Lets start by inspecting the project structure to grasp a better understanding of it:
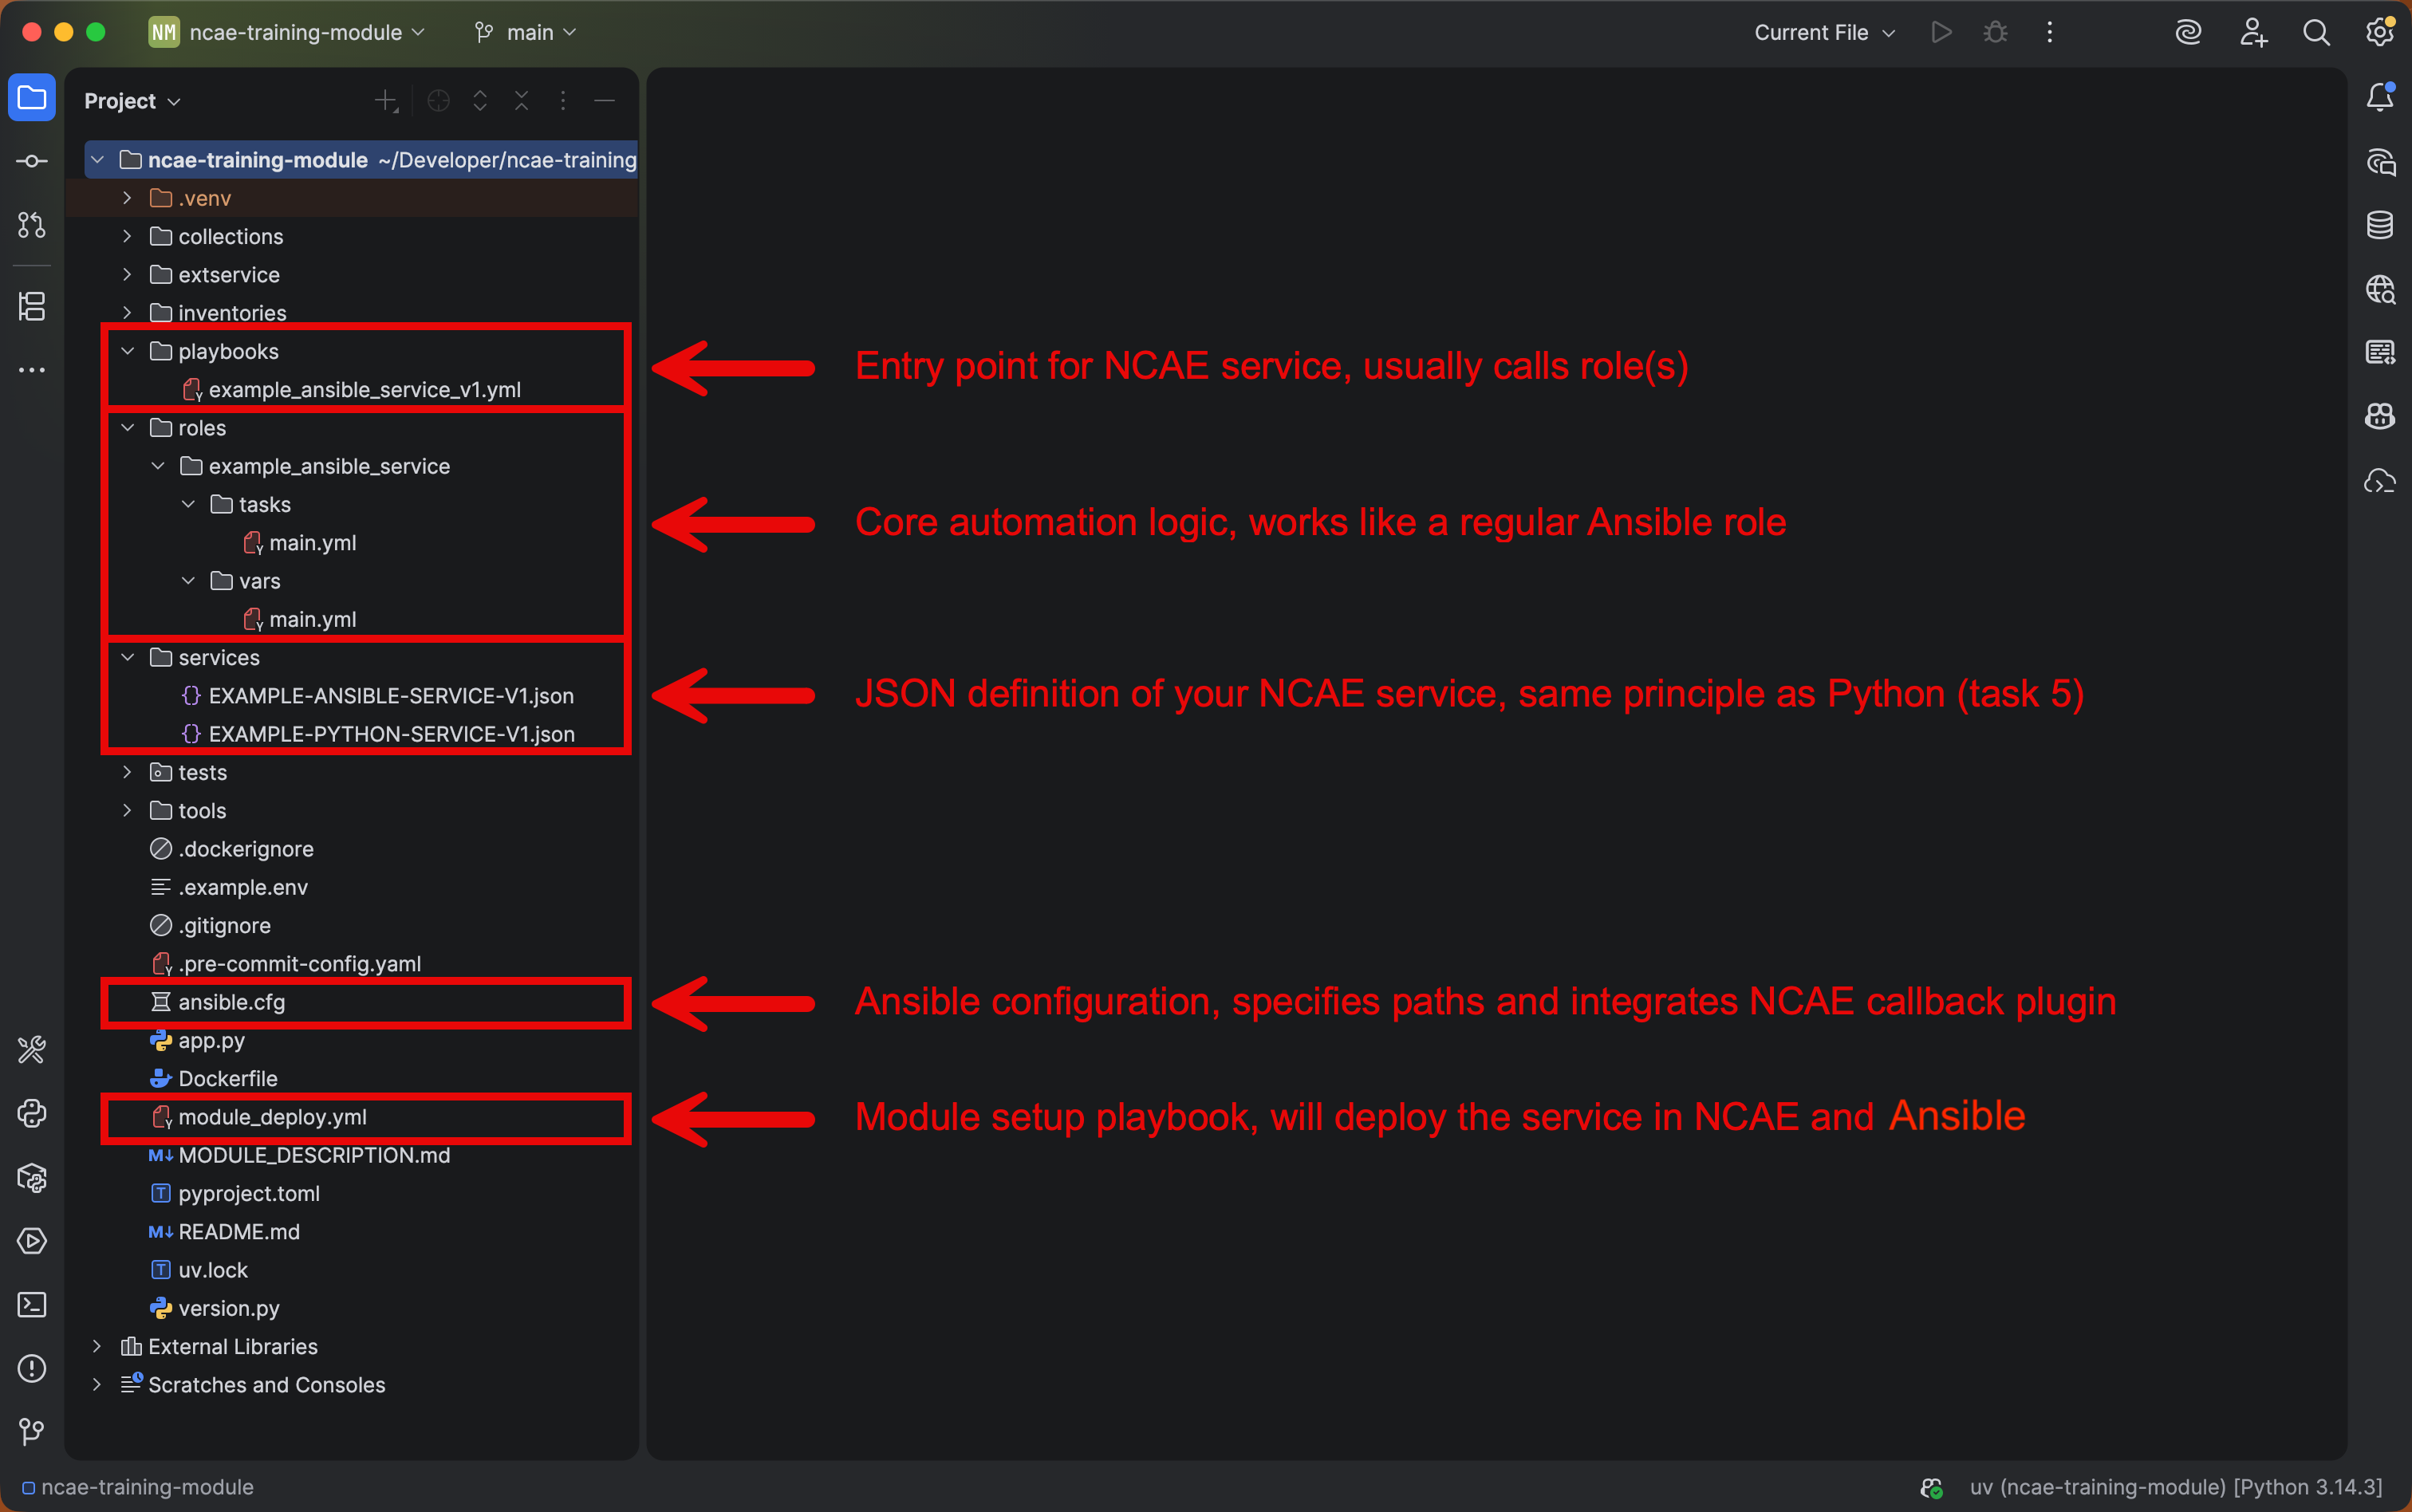
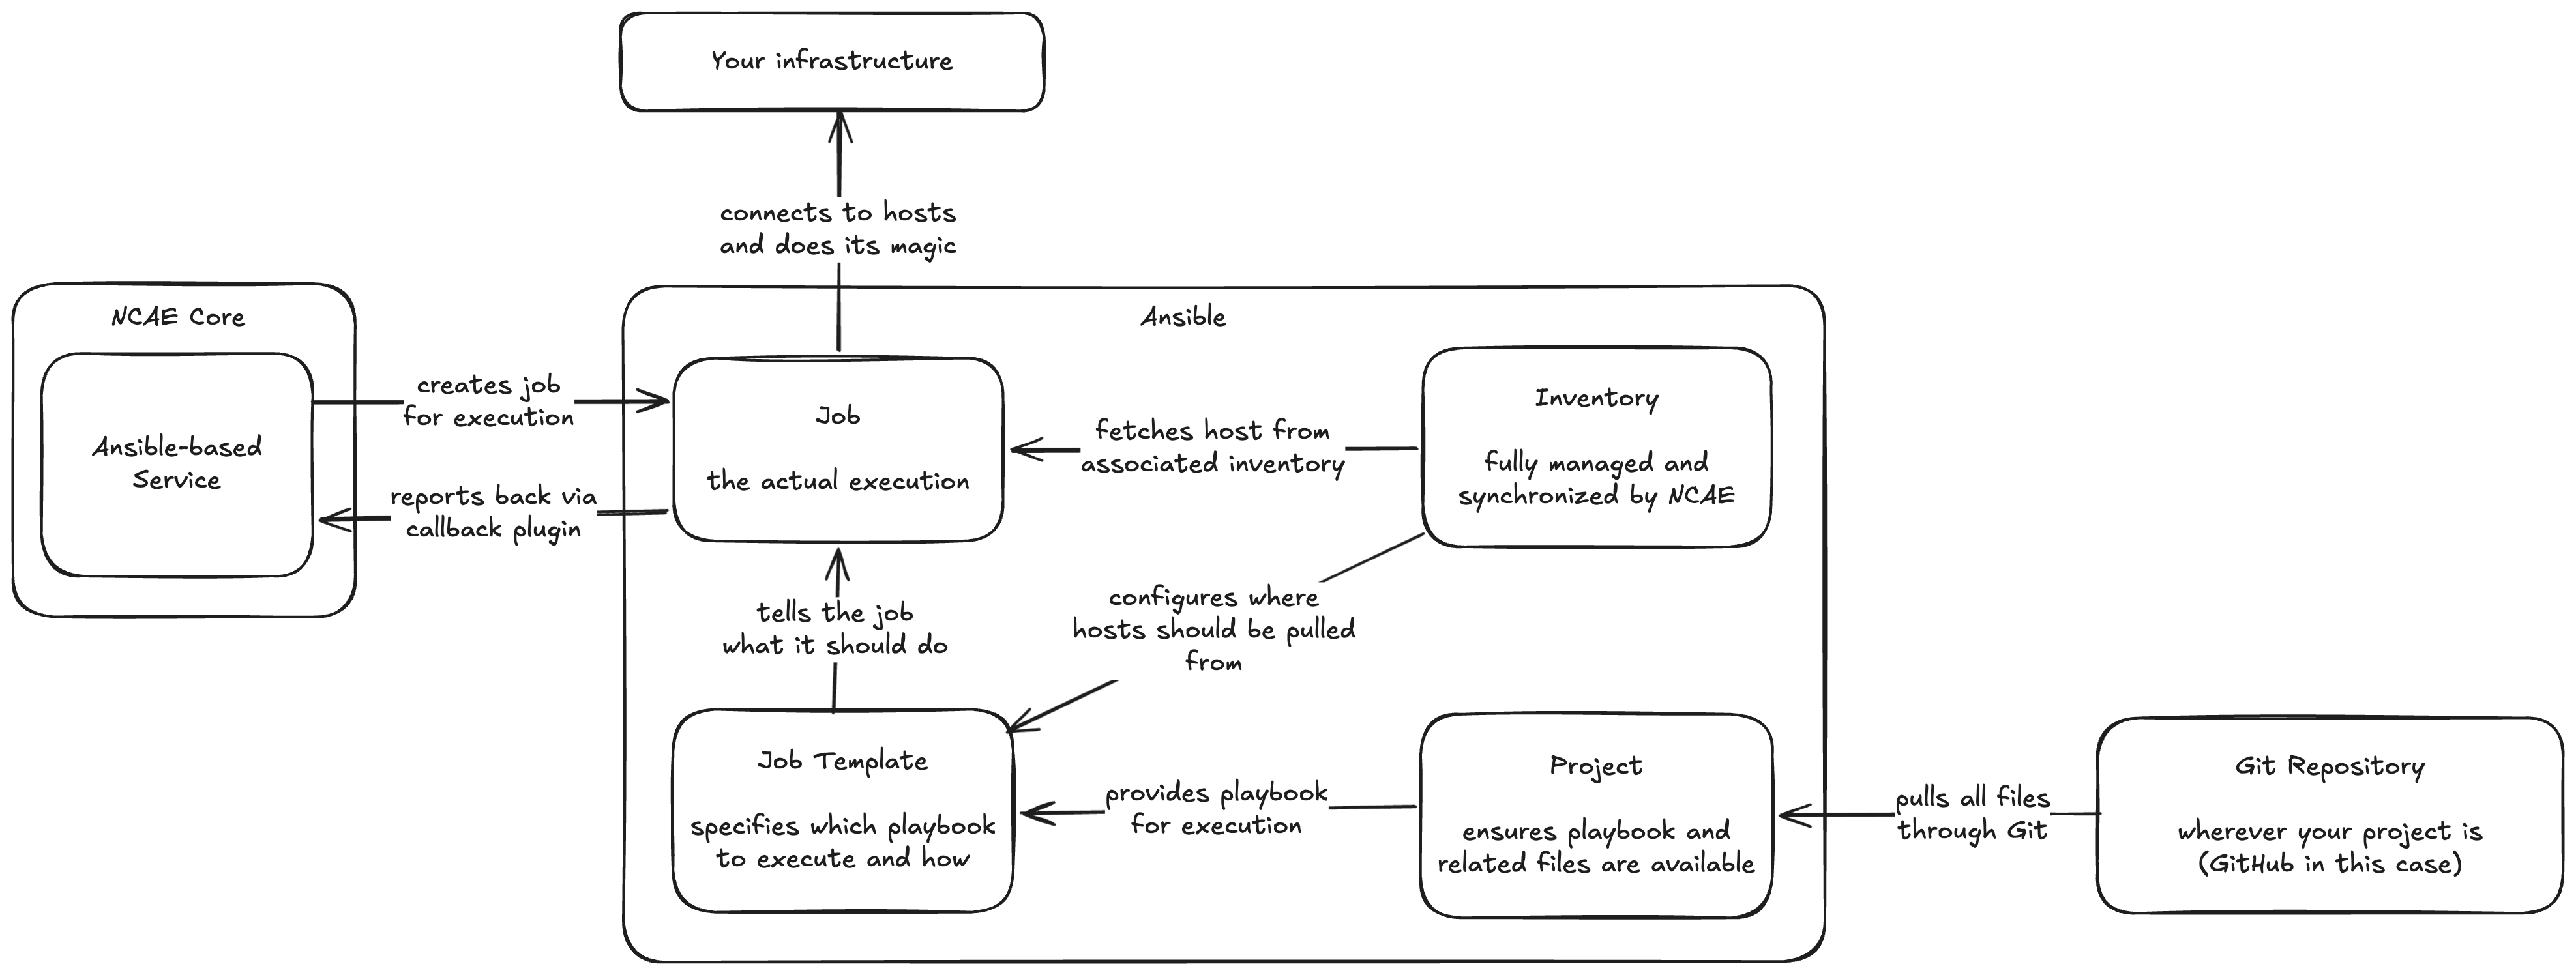
In addition to the project structure, it is also important to understand the execution flow, specifically how NCAE interacts with its integrated Ansible Execution to run your Ansible playbooks:
Create your Ansible Playbook
Now its time to actually create your Ansible-based service! Start by creating a new file in playbooks/config_vlan.yml
and add the following content to it:
---
- name: VLAN Service
  hosts: all
  gather_facts: false
  vars:
    # These variables are needed for the cisco.ios collection and will vary depending on the device you're targeting
    # This is not NCAE-specific, and you can find the relevant variables for each collection in their documentation
    ansible_connection: ansible.netcommon.network_cli
    ansible_network_os: cisco.ios.ios
    ansible_become: yes
    ansible_become_method: enable
  tasks:
    - name: Execute VLAN Service
      ansible.builtin.include_role:
        name: config_vlan
As you can see, any regular Ansible Playbook can be used as-is during integration with NCAE. In this case, the playbook
simply includes a role named config_vlan, to keep its content clean and modular. The next step is to create this role
by following these steps:
- Create a new directory named
config_vlanin therolesdirectory - Inside the
config_vlandirectory, create a new directory namedtasks - Inside the
tasksdirectory, create a new file namedmain.yml - Add the following content to
main.yml:
---
# This task only runs when the NCAE service instance is being provisioned or updated.
# Notice how 'when' is used to only run when the NCAE 'decommission' variable is not true.
- name: Configure VLAN
  cisco.ios.ios_vlans:
    state: merged
    config:
      - state: active
        vlan_id: "{{ data.vlan_id }}"
        name: "{{ data.vlan_name }}"
  when: not decommission

# This task only runs when the NCAE service instance is being decommissioned.
# Notice how 'when' is used to only run when the NCAE 'decommission' variable is true.
- name: Remove VLAN
  cisco.ios.ios_vlans:
    state: purged
    config:
      - vlan_id: "{{ data.vlan_id }}"
  when: decommission
As you can see, we are using the Cisco IOS Ansible collection configure a VLAN on the switch, along with two separate tasks for provisioning and deprovisioning the service. The two “magic” variables used in this example for NCAE integration are:
data: This variable contains all the data from the service instance form, which will be created in the next step. In this example, we are usingdata.vlan_idanddata.vlan_nameto access the form fields for VLAN name and VLAN ID.decommission: This variable is a boolean which is set totruewhen the service instance is being deprovisioned, andfalseotherwise. This allows us to use the same playbook for both provisioning and deprovisioning tasks, by simply adding awhencondition to the relevant tasks.
Given that our logic is quite simple, we were also able to make use of the
cisco.ios collection. If you never heard of collections before, imagine it as
a way to share modules / extensions for Ansible. In this case, the cisco.ios collection contains a module named
ios_vlans, which allows us to easily manage VLANs on Cisco IOS devices.
Integrate Third-Party Collections
However, while the usage of cisco.ios is convenient, it is not available in Ansible by default, which means we need to
add it as a dependency to our project. In order to do that, you would add the following lines to the
collections/requirements.galaxy.yml file (don’t do that yet, keep on reading…):
- name: cisco.ios
  type: galaxy
  version: 9.2.0
Unfortunately things are a bit more complicated with airgapped environments, and there are actually multiple files involved:
- The
collections/requirements.galaxy.ymlis for your own reference and specifies what the repo should contain, but it is not used during execution. - The
collections/requirements.ymlis used during execution, but it is not meant to be edited manually, as it is auto-generated by the Ansible Galaxy CLI. - The
collections/requirements.ymlwill point to local TAR archives stored in thecollections/directory, which means you will need to download the relevant collections as TAR files and place them accordingly.
Normally we would now advise you to:
- Add the beforementioned lines to
collections/requirements.galaxy.yml - Run our helper script
tools/update-collection.shto automatically update everything
This would however require your machine to have a Bash shell as well as access to the Ansible CLI tooling. To simplify
things for you, we have prepared an archive which you can download, extract and copy into your collections/ directory,
overwriting any existing files:
Once completed, your file structure should be looking like this, showing the additional IOS collection in place, along with its internal dependencies.
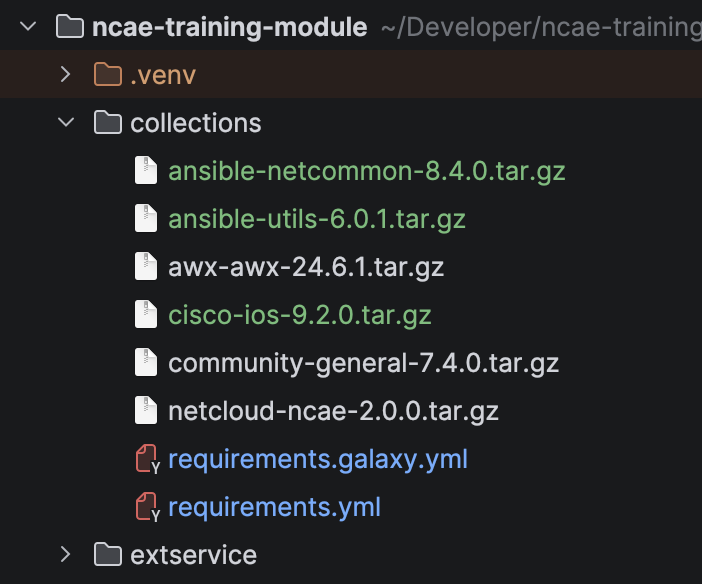
With a keen eye, you might have also spotted that we ship our own netcloud.ncae collection, which helps with the
integration of NCAE-specific features into your Ansible playbooks.
Create a new Service in NCAE
Now that we have our Ansible playbook ready, it’s time to create a new service in NCAE which will execute it. This process is quite similar to the previous Python Service, so we will abbreviate some of the steps and focus on the new ones:
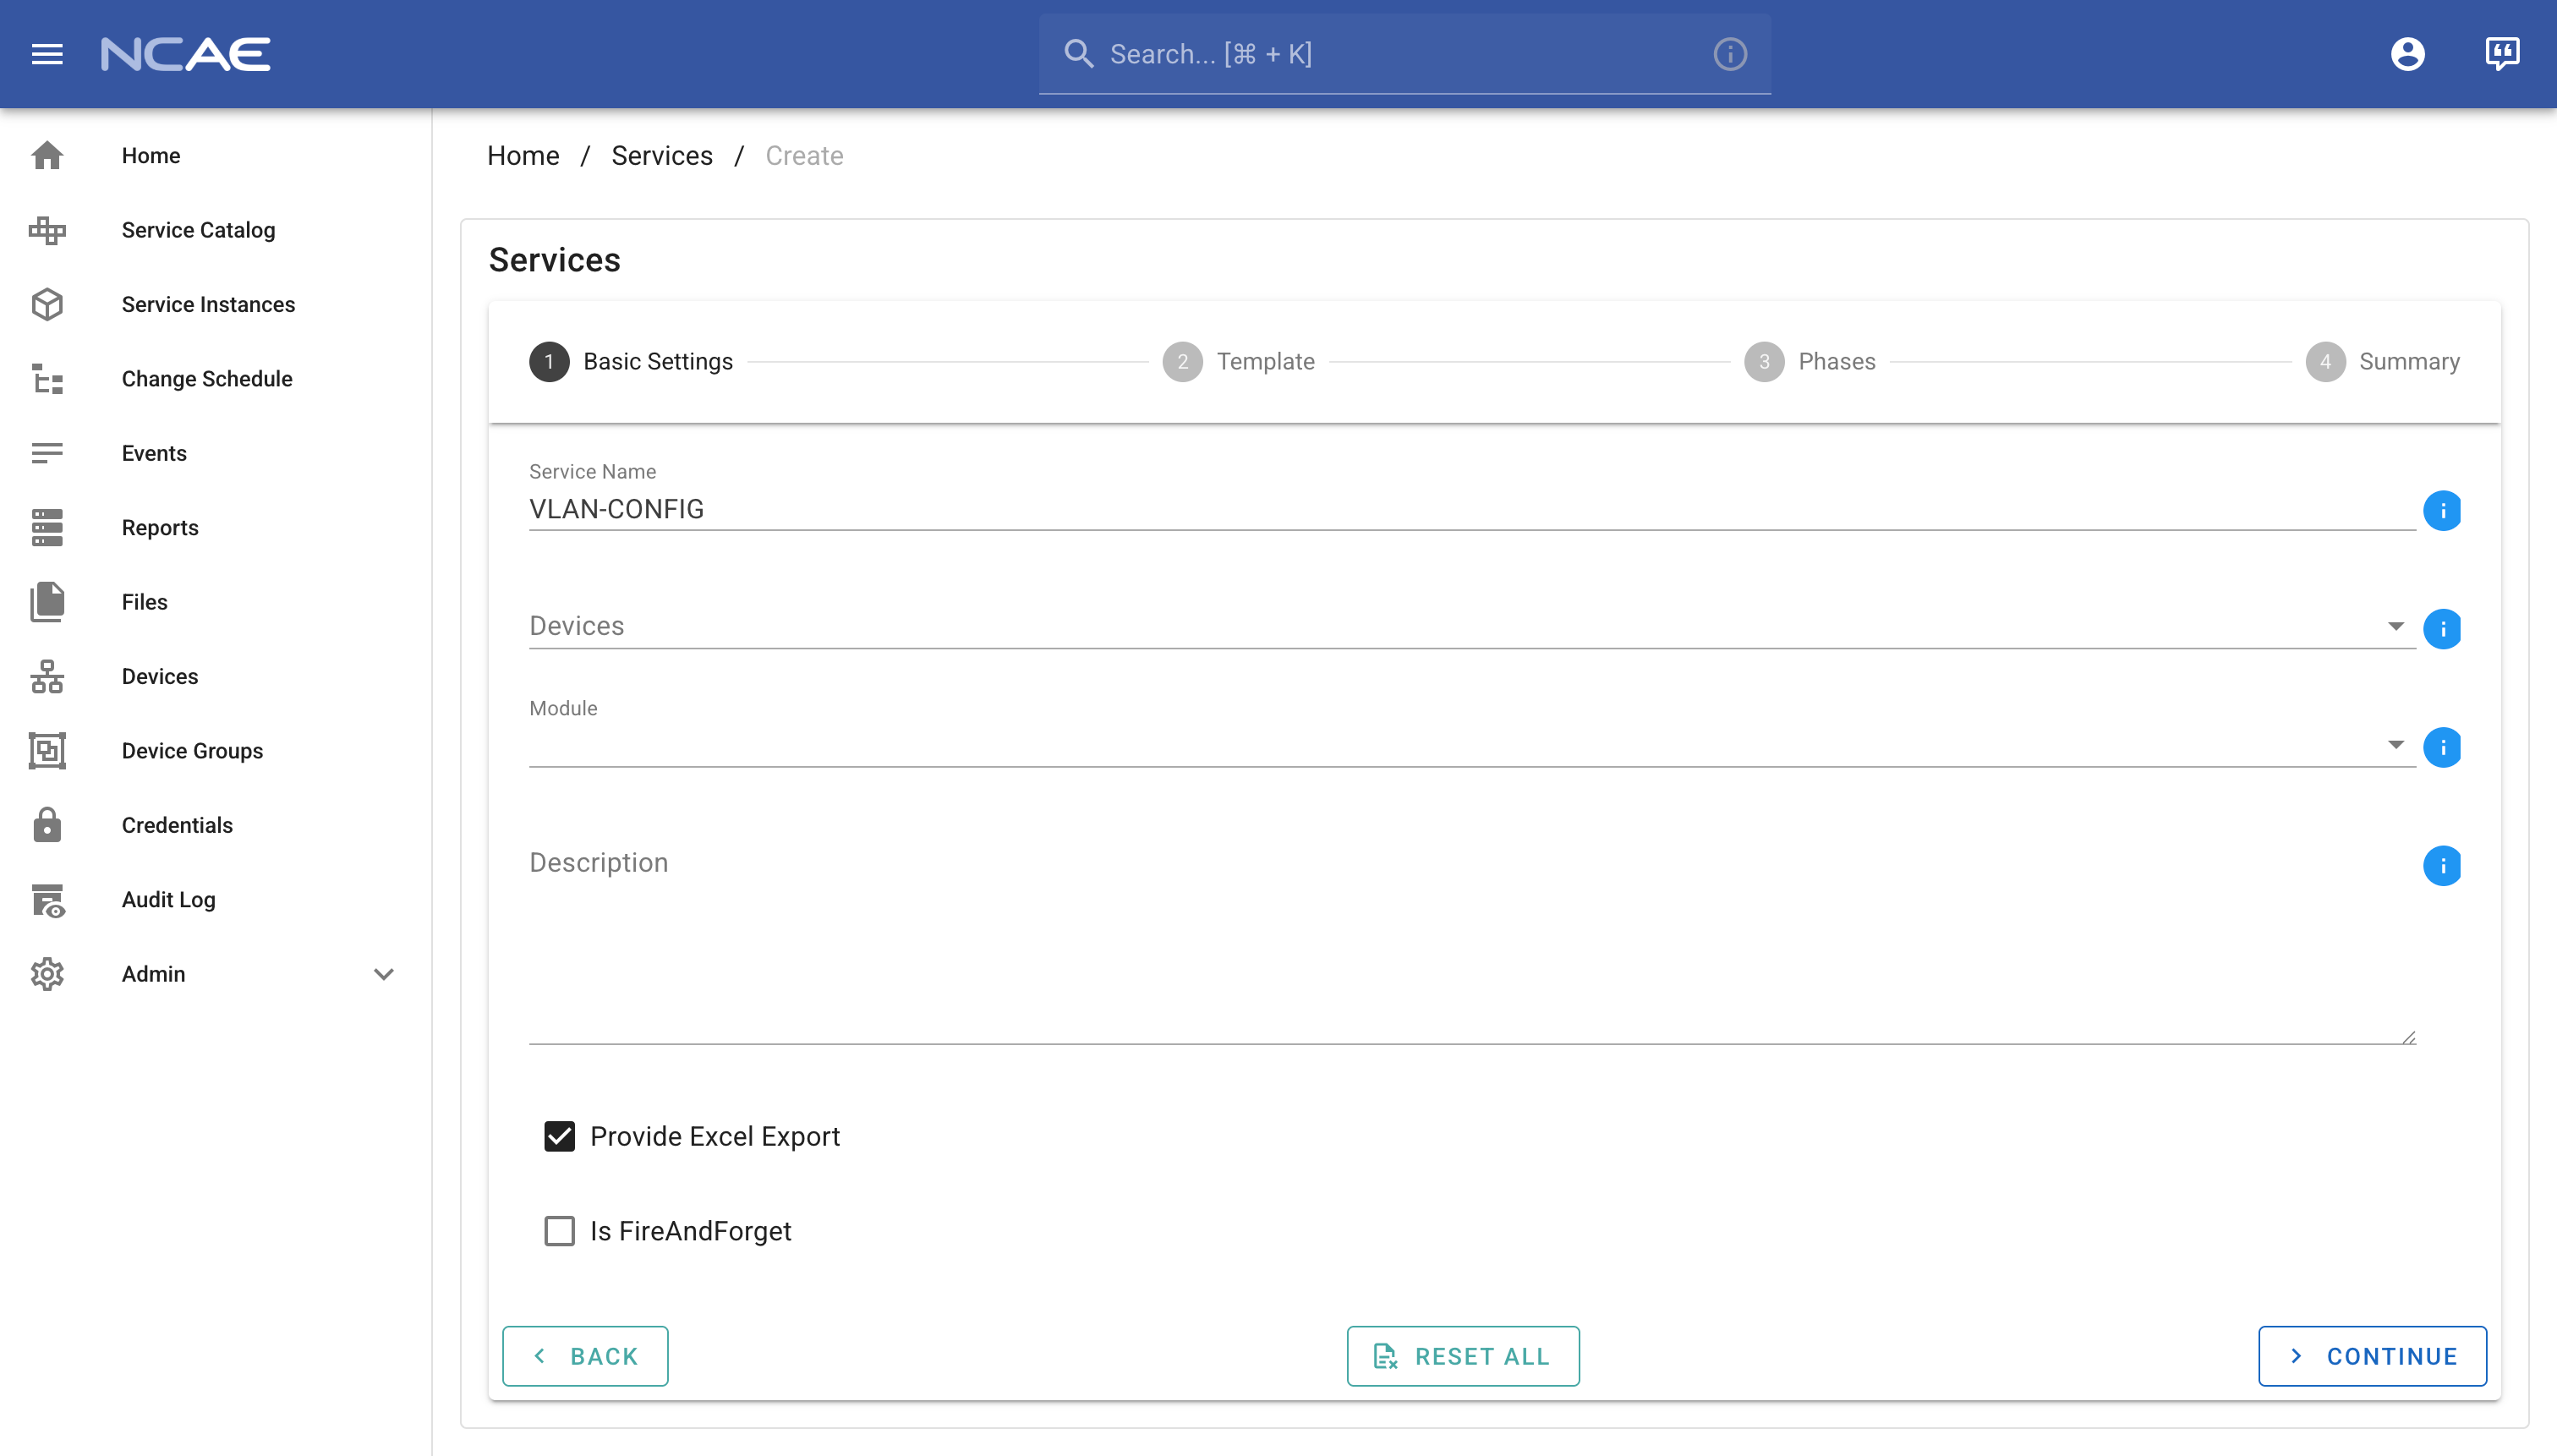
- Create a new service in NCAE named
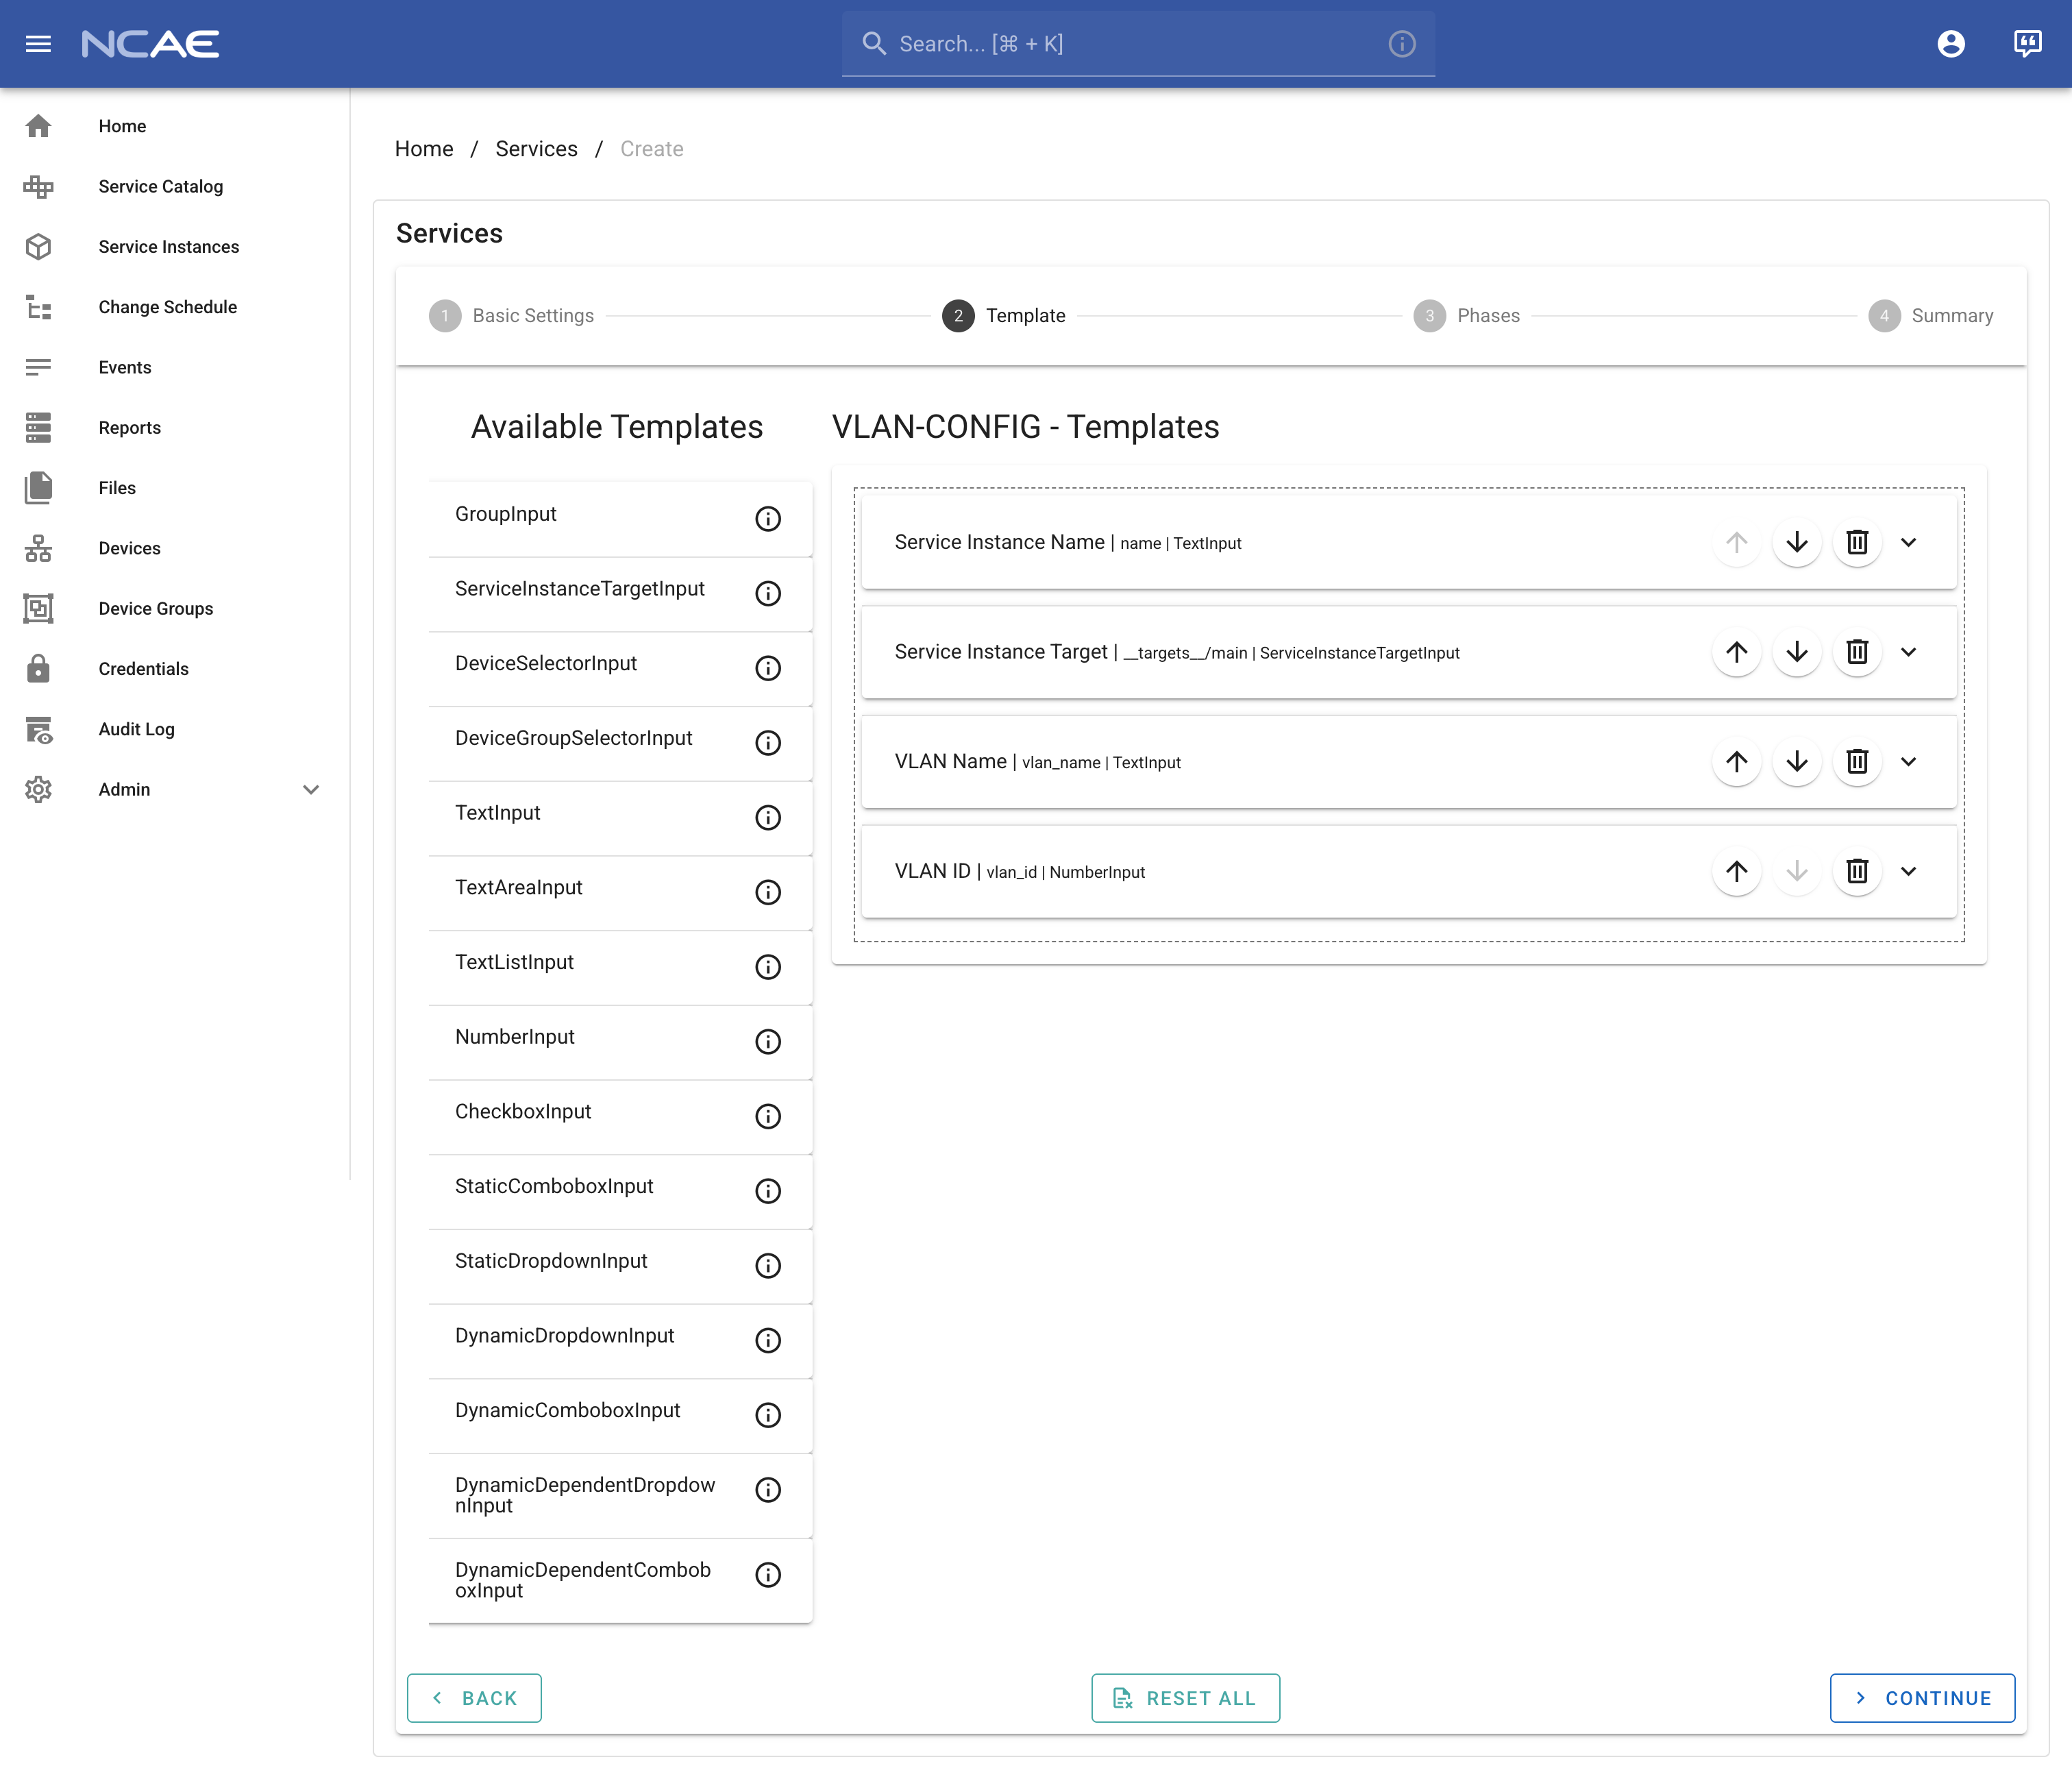
VLAN-CONFIGor something similar - In the template section, add these three fields to your service template
ServiceInstanceTargetInputwith default settingsTextInputwith labelVLAN Name, namevlan_nameand bothRequiredandEditableNumberInputwith labelVLAN ID, namevlan_idand bothRequiredandEditable
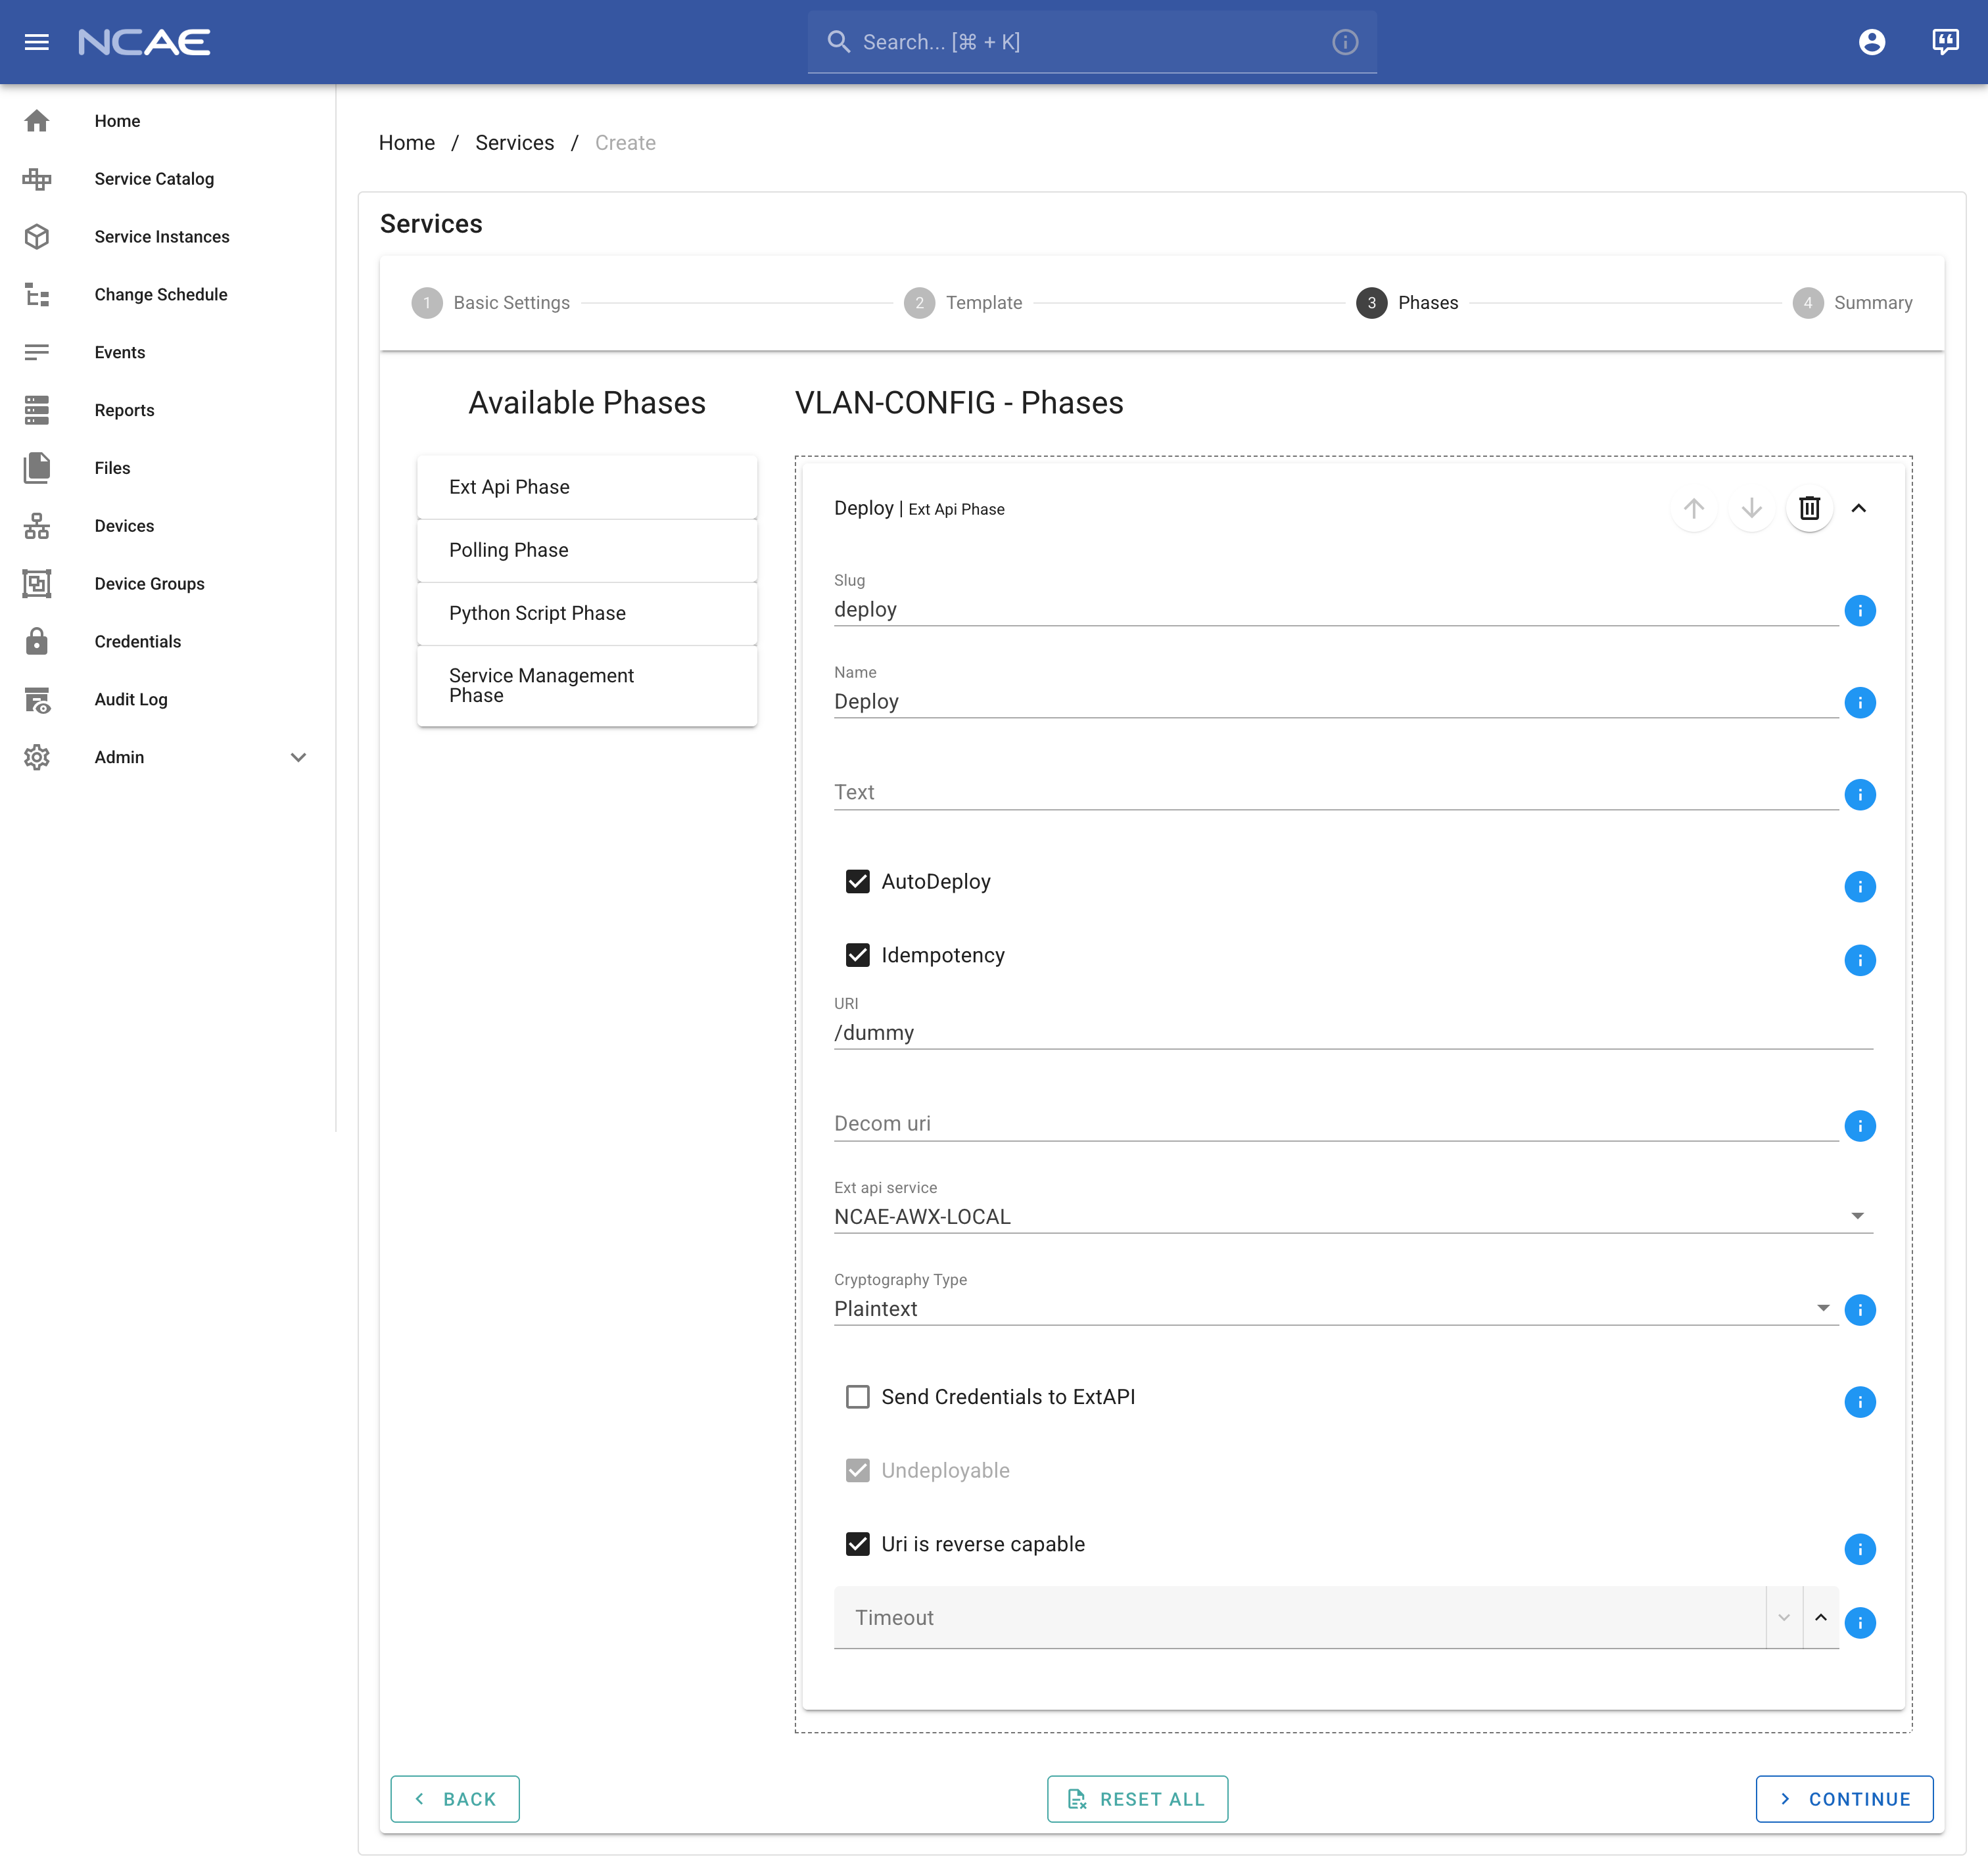
- In the phases section, add one phase of type
Ext Api Phasewith these details:- Slug: should be
deploy - Name: should be
Deploy - Auto Deploy: should be enabled
- Idempotency: should be enabled
- URI: should be
/dummy(does not matter for Ansible phases) - Ext api service: should be
NCAE-AWX-LOCAL - Uri is reverse capable: should be enabled
- Slug: should be
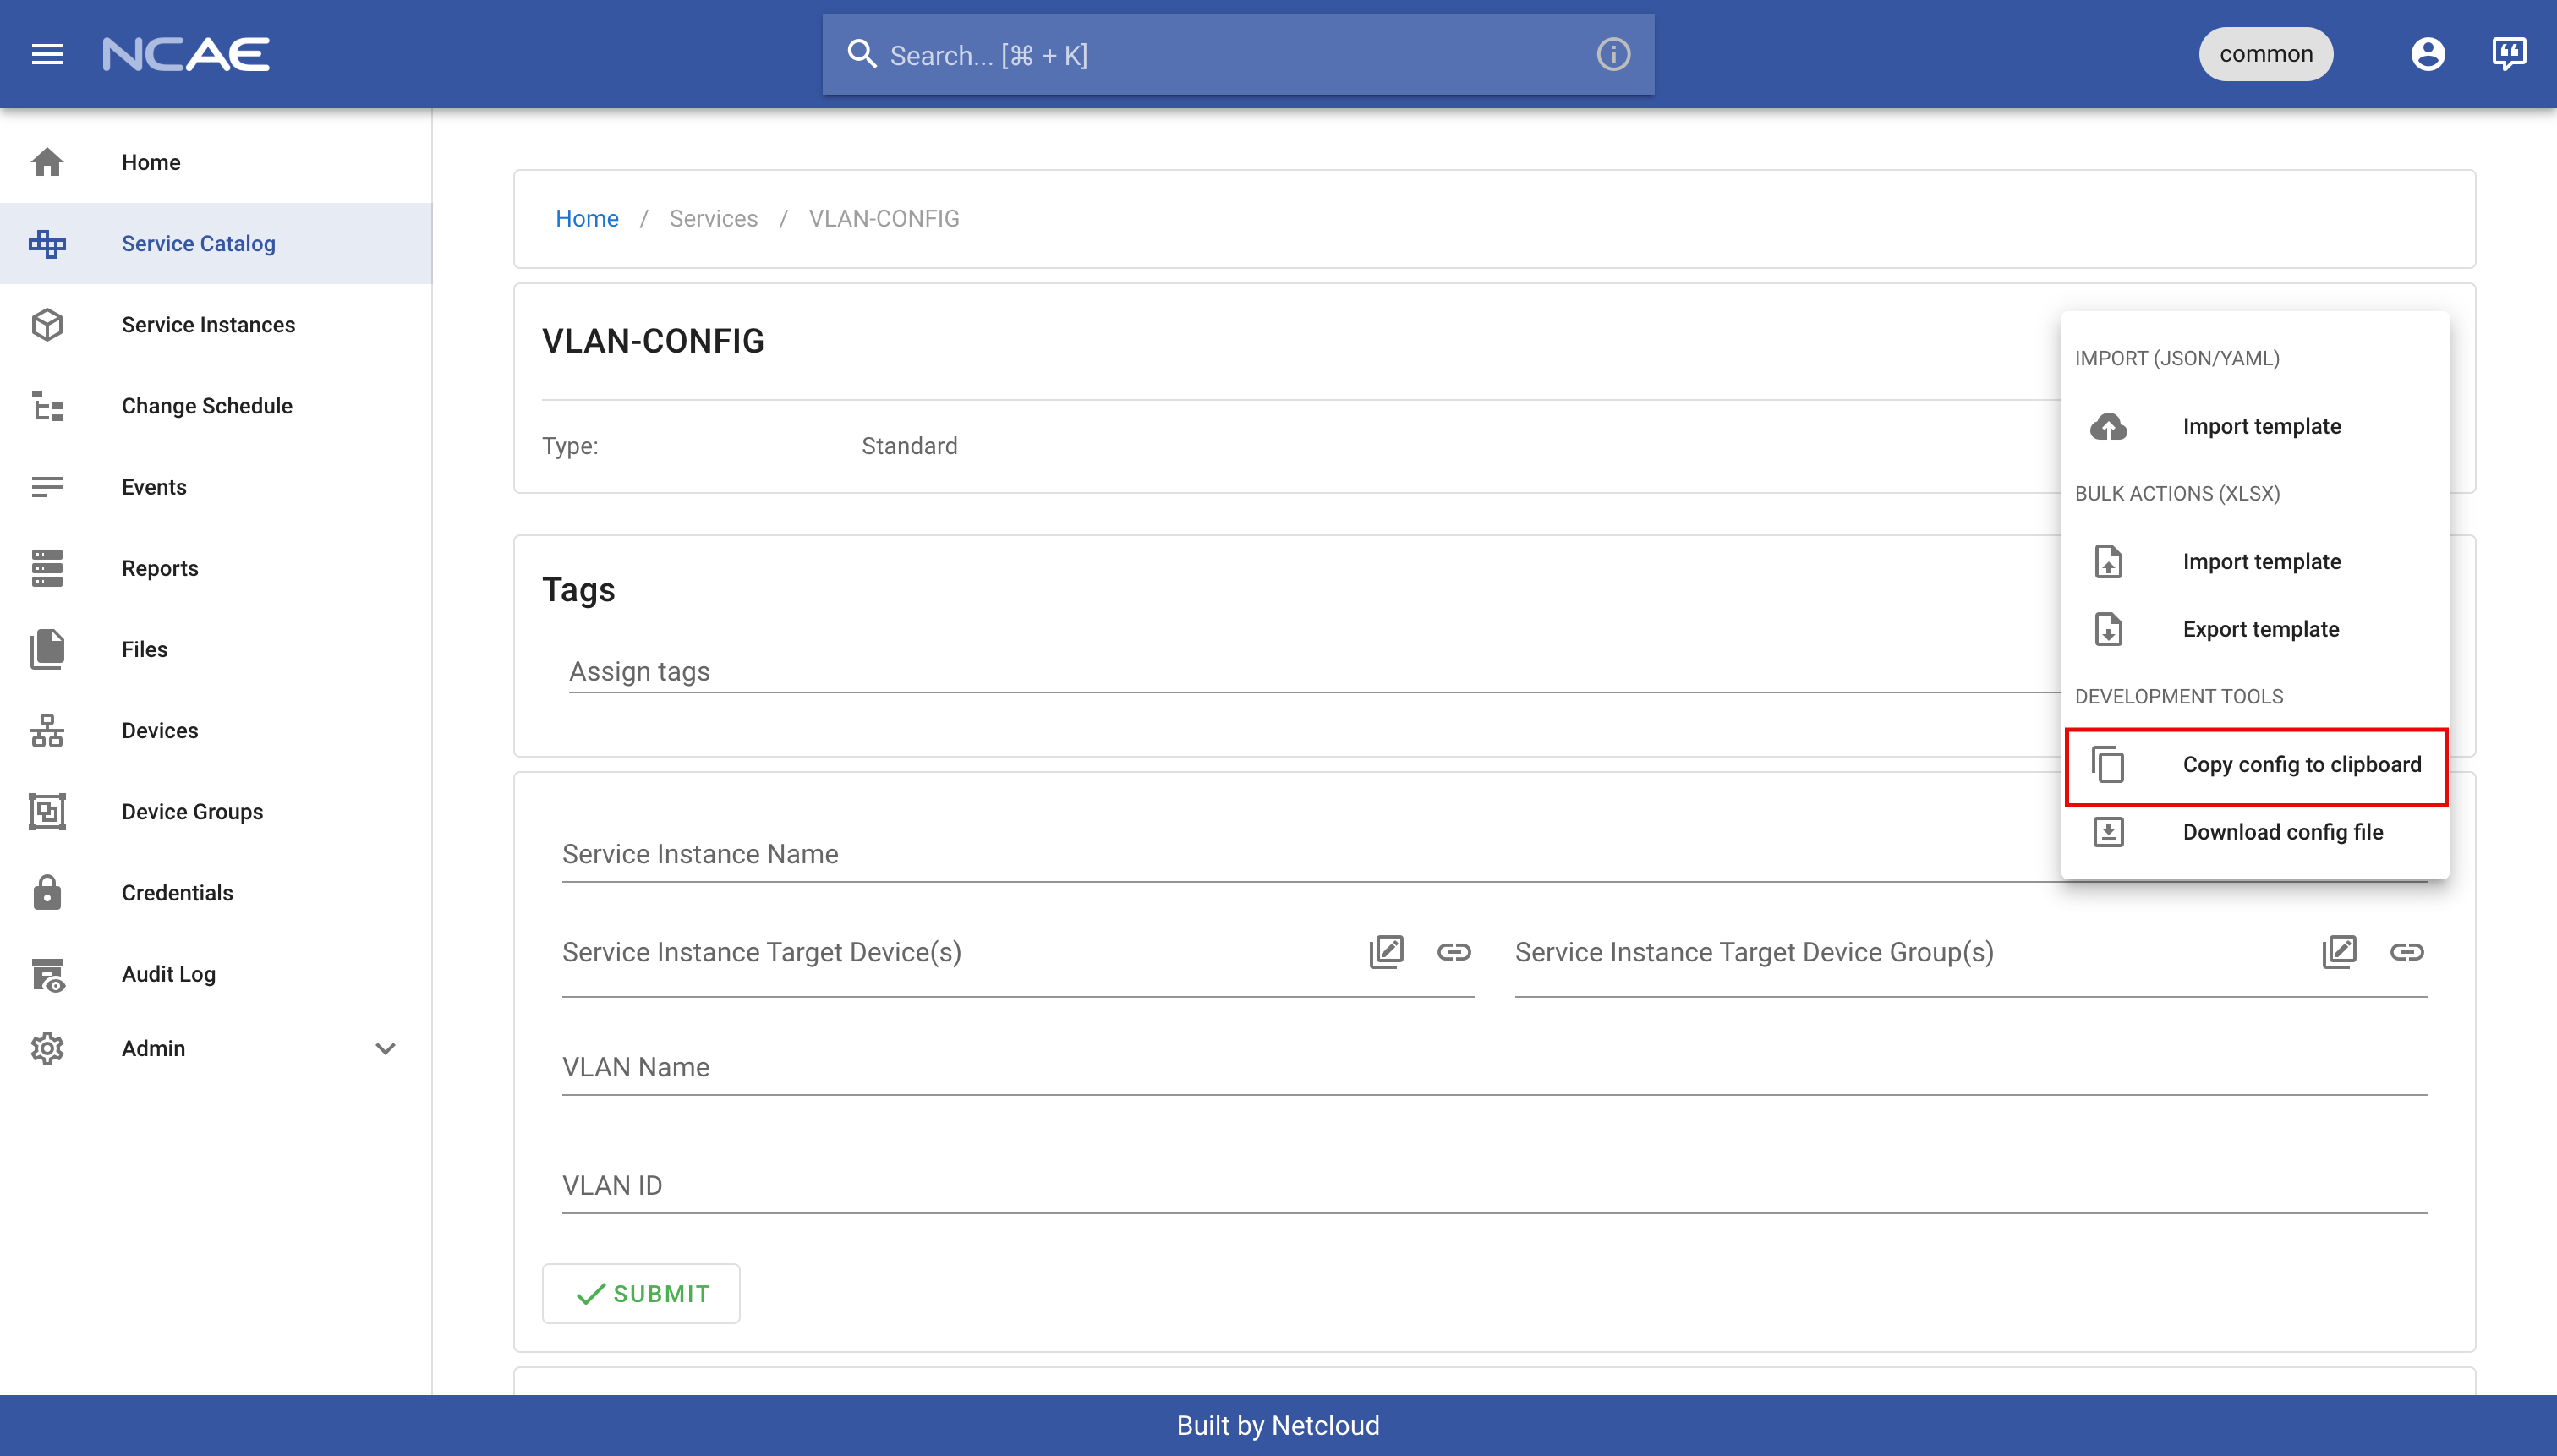
- Confirm creating the service and copy its configuration as learned in Task 05, meaning click the three-dot menu on
the top right of your service page, then click
Copy config to clipboard.
For your reference, here are also some screenshots showcasing this process:
With the service configuration in your clipboard, create a services/VLAN-CONFIG.json file in your project and paste
the configuration there. To reiterate, you’ve:
- Written an Ansible playbook and role for your use case
- Integrated a third-party collection into your project
- Created a new service in NCAE and copied its configuration into your project
Hook Everything Together
The remaining step is to update the module setup playbook, stored in module_deploy.yml in the repository root, to
actually deploy your Ansible-based service to the NCAE. Similar to a Python based service, you will need to insert an
additional task into this file, preferably below the EXAMPLE-ANSIBLE-SERVICE-V1 task:
---
- name: NCAE Module Setup
  hosts: localhost
  gather_facts: false
  tasks:
    # ... previous tasks like module setup, inventory, and so on ...
    # ... technically the order does not matter, and you can place this new task anywhere ...
    # ... however, for cleanliness, it may make sense to put it below "EXAMPLE-ANSIBLE-SERVICE-V1" ...

    ###############################################
    ########## ONLY COPY BELOW THIS LINE ##########
    ###############################################
    - name: Manage Manage VLAN-CONFIG service
      ansible.builtin.include_role:
        name: netcloud.ncae.module_setup
        tasks_from: service
      vars:
        module_setup_service_data: "{{ lookup('file', 'services/VLAN-CONFIG.json') | from_json }}"
        module_setup_service_awx_phase_map:
          deploy:
            playbook: playbooks/config_vlan.yml
            inventory_id: "{{ _manage_device_inventory.inventory.id }}"
Lets discuss the most important lines of this task:
- module_setup_service_data must point to the JSON file containing your service configuration, just like with any other service, e.g. a Python-based one.
- module_setup_service_awx_phase_map is used to map specific phases (identified by their slug, which in your case
was
deploy) to specific playbooks and inventories. - playbook parameter should point to the playbook you want to execute for this phase, which in this case is the
playbook we created earlier at
playbooks/vlan.yml. - inventory_id parameter does not have to be changed by you, as it is already properly set up earlier in the module
setup, so
"{{ _manage_device_inventory.inventory.id }}"will be the correct choice in 99% of choices.
You may now commit all your changes and push them to the Git repository, using the same steps as in Python Service. Once your changes are in the repository, head to “Admin -> Modules” in the NCAE UI and update your module to the latest version in the same way too.
Geeky Details about Module Setup and Ansible Integration
As you’ve learned so far, the execution of Ansible works through an ExtApiService phase as well, just like a Python
executor. A reason behind this is that our job API is compatible with the Ansible Execution API for submitting jobs,
which means that the same API payload can be used for this matter.
There is however the technical challenge that the Ansible Execution does not offer the choice to simply run playbooks - instead, before any kind of execution happens, a job template has to exist. The module setup role takes care of this task, by automatically creating a job template for each mapped phase, and linking it to the relevant playbook and inventory.
Additionally, the same module setup role will also update the phase URL for each mapped phase, which is why you were
able to simply specify /dummy earlier on - it will be automatically set to the right URL to call a specific job
template in Ansible Execution.
Test your Service
Now that everything is set up, you can finally test your new Ansible-based service! Start by creating a new instance of your service, fill in the form fields with the relevant VLAN name and VLAN ID, and then click “Deploy”.
You should see the playbook being executed, and if you check your switch, the VLAN should be created as well. Finally, try decommissioning the service instance and check if the VLAN is removed again. If everything works as expected, congratulations on successfully creating your first Ansible-based service in NCAE!
Bonus Task
Your current automation adjusts the VLAN configuration on the switch, but the changes are only in the running configuration and will be lost after a reboot.
Check out the documentation for the
cisco.ios.ios_config module
and find out if you can adjust your playbook to also save the configuration.
Hint: There is a specific example available in the documentation, you just have to find and adapt it.